
Turn a Script into Multi-Voice Audio
Paste or upload a script with speaker labels and Voice Creator Pro detects each speaker automatically, so you can assign a voice to each one and generate multi-voice audio.
Turn a Script into Multi-Voice Audio
If your text is written like a play, with each line attributed to a named speaker, Voice Creator Pro can read it back with a different voice for every character. Paste or upload the script, and the app detects the speakers automatically. You then pick one voice per speaker and generate. This is ideal for podcasts, plays, screenplays, and dialogue-heavy books.
This is different from weaving voices into ordinary prose. If your text is narrative with dialogue mixed into the paragraphs (for example, a novel), use the Use Multiple Voices in an Audiobook tutorial instead. This tutorial is for scripts where every line already names who is speaking.
What You Will Need
- Voice Creator Pro, running either as the desktop app on your machine, or in your browser with VCP Cloud
- A script where each line of dialogue is labelled with a speaker name
- One voice per speaker, ready in your Library (we will cover this below)
Step 1: Format Your Script
Write or export your script so each line starts with the speaker's name. Voice Creator Pro recognises several common label formats, so you can use whichever your script already uses:
[Anne] "I'm going to need to see your logs."
Anne: "I'm going to need to see your logs."
(Anne) "I'm going to need to see your logs."
<Anne> "I'm going to need to see your logs."
All four styles work the same way. Pick one and stay consistent throughout the script. A short example might look like this:
Robert: The notification appeared at 3:47 AM: "Critical system update required."
Anne: Maya stared at her phone screen, the blue glow harsh against the dark room.
Robert: She hesitated, then tapped "Install now."
Anne: Nothing could have prepared her for what happened next.
Any line without a label is treated as belonging to the previous speaker, so you only need to add a label when the speaker changes.
Step 2: Prepare a Voice for Each Speaker
Before importing, get a voice ready for each speaker in your script. You can mix and match voice types freely:
| Voice source | Where to find it | When to use it |
|---|---|---|
| Built-in voices | Lab > TTS tab | Quick start, no setup needed |
| Cloned voices | Lab > Clone tab | Match a specific real person's voice |
| Designed voices | Lab > Design tab | Create a voice from a text description |
| Community voices | Voice Search (sidebar) | Browse voices shared by others and click Import to Clone Library |
Keep cloned and community reference audio between 3 and 10 seconds. Longer reference audio does not improve quality and makes generation slower. Save each voice with a clear name so it is easy to pick during assignment. For a full walkthrough, see the Clone a Voice tutorial.
Step 3: Import the Script
- Open the Audiobooks section from the sidebar and create a new audiobook.
- Import your script file (EPUB, PDF, DOCX, or plain text) or paste the text directly with Ctrl+V (Cmd+V on macOS).
- Voice Creator Pro scans the text, extracts the speaker labels, and opens the Assign voices to speakers dialog.
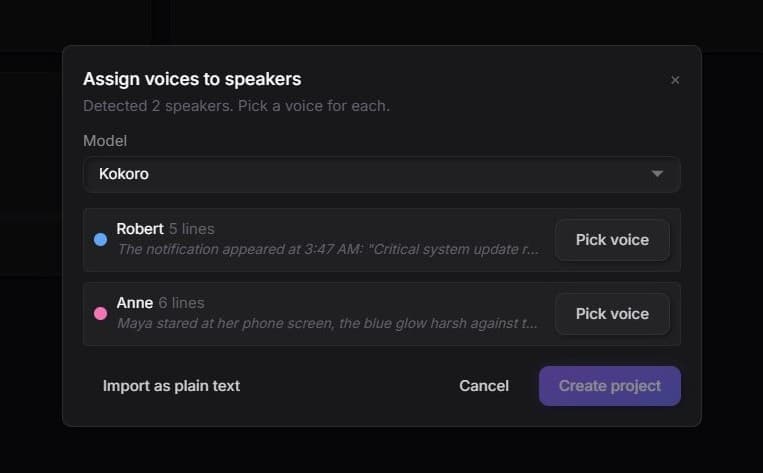
The dialog confirms how many speakers it found, for example "Detected 2 speakers. Pick a voice for each," and lists each speaker with a line count and a preview of their first line.
Step 4: Assign a Voice to Each Speaker
In the Assign voices to speakers dialog:
- Choose the Model you want to generate with from the dropdown at the top. It applies to every speaker.
- For each speaker, click Pick voice and choose the voice you prepared for them. The colored dot next to each name is that speaker's marker throughout the audiobook.
- Once every speaker has a voice, click Create to build the audiobook.
Voice Creator Pro splits the script into segments and assigns each speaker's lines to their chosen voice automatically. You do not need to highlight anything by hand.
Just want one narrator? Click Import as plain text in the same dialog to skip speaker detection and bring the script in as ordinary narration with a single voice.
Step 5: Preview, Generate, and Export
- Preview a segment or two for each speaker to make sure every voice sounds right in context. If a voice needs work, tweak and re-save it in the Lab and the audiobook picks up the update automatically.
- Click Generate to produce audio for all segments. Each line plays in its speaker's assigned voice.
- Export to your preferred format (MP3, WAV, FLAC, or M4B with chapter markers).
You can still fine-tune afterward: reassign a speaker's voice, override the voice on an individual segment, or adjust pacing between lines. See Voice Assignment for the full set of controls.
Tips
- Label only on speaker changes. Consecutive lines from the same speaker do not each need a label; a line inherits the previous speaker until a new label appears.
- Keep names consistent. "Anne" and "ANNE" or "Anne " with a stray space can be read as different speakers. Use the exact same spelling every time.
- Prepare voices first. Having a saved voice for each speaker before you import means you can assign everyone without leaving the dialog.
- Check the detected count. If the dialog reports more or fewer speakers than you expect, close it, fix the labels in your script, and re-import.
- Mix voice types freely. A cloned host voice alongside designed guest voices works well; there is no need to stick to one voice source.
Next Steps
- Use Multiple Voices in an Audiobook - Assign voices inside narrative prose where dialogue is woven into paragraphs
- Voice Assignment reference - Full details on section, segment, and inline voice controls
- Clone a Voice tutorial - Step-by-step guide to creating cloned voices
- Audiobooks overview - The full workflow from import to export
Use Multiple Voices in an Audiobook
A step-by-step tutorial for assigning multiple voices to different speakers in a Voice Creator Pro audiobook, with inline dialogue handling.
Transcribe Audio to Text
A step-by-step tutorial for transcribing audio to text in Voice Creator Pro using uploads, YouTube URLs, and live recording.